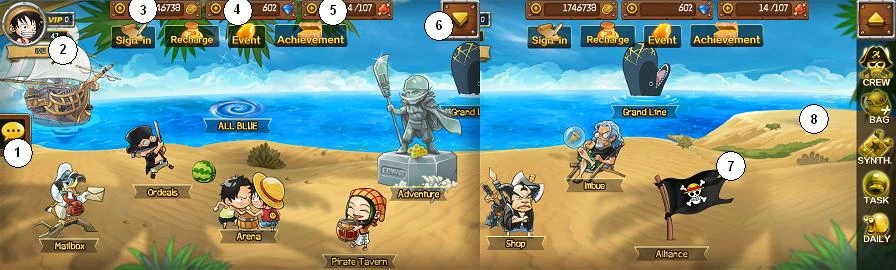
1=Chat
2=Player Pannel
3=Beli (also known as coins or gold)
4=Diamonds
5=Meat (also known as stamina)
6=Upper right side drop down menu
7=Takoyaki Stand (rarely appears after a fight)
8=Level 5.5 Shop (rarely appears after a fight)
Chat
Click here to open the chat system where you will be able to talk to others players who are online. You can also open the chat with your alliance or send private messages to a player.
Player Profile
This shows your VIP level, crew level and crew name. Clicking on it will pop a menu. You can change your avatar by clicking the pirate. Upgrading the equipment all the way to level 7 (purple frame) for a pirate will allow you to change your avatar to the respective pirate's icon.
In this window you will also notice that this game uses "crew level" and "pirate level". The difference is that "crew level" is the limit as which you can do various things, regardless of what pirates you own, and also sets the limit for your pirate's level. A pirate level can never be higher than the crew level of the crew he belongs to.
Another thing important to remember is "server time". Various things on this game will function according to server time, not your local time, so you should keep this in mind and not get confused later on in the game.
Beli
These are the main currency in the game. You can get them by exchanging diamonds for beli, clearing certain achievements, signing in, clearing certain tasks or dailies, playing in Adventure, Ordeals, All Blue, Grand Line or by "cheering" other crews in your alliance.
You can use them to buy drinks at the "Pirate Tavern", items at the "Shop" (in rare cases, Takoyaki Stand and Level 5.5 Shop), Imbue items at "Imbue", synthesize items, or leveling up your crew (note that to level your crew, you also need enough skill points, and the skill level has a certain level cap according to the crew mate)
Note that there are other types of currency:
-Arena coins are used to buy items at the Arena Store (go to Arena and click "Exchange" in order to check the store. Your ammount of arena coins are shown on the upper left side). You can get coins by having *unknown arena rank* at 2100. The ammount of coins you get depends on your rank, you can check by clicking the "Rules" button in the Arena menu. The reward is given daily. Note that your rank is not lowered when you lose a fight, but it will be lowered if a player decides to attack you
-Grand Line coins are used to buy items at the Grand Line Store (go to Grand Line and click "Exchange" in order to check the store. Your ammount of arena coins are showed on the upper left side)
Diamonds/Recharge
Diamonds are a special type of currency required to make certain exchanges that give you the edge over other players. They can easily be obtained by purchasing them at the VIP shop (you can enter the VIP shop by pressing the (+) sign on the left side of the diamonds icon or by clicking "Recharge".
Luffy ate all the meat, and now our staff is starving. For a modest ammount of money, you can feed our staff and we will guarantee to give you vast ammounts of valuable diamonds in return, with which you will easily have a big advantage over other crews! Remember, the more you invest, the better the price ratio!
There are endless advantages, listed by going into the VIP shop, and then clicking "info". There are different levels of VIP, from 1 to 15.
Meat
Meat (also known as stamina) are used as tokens for starting battles. Most battles require a certain ammount of meat (Adventure normal/elite, All Blue and Ordeal battles) however there are other type of battles that do not require meat, and instead, require some other kind of tokens (Grand Line and Arena battles). In other words, you have a limited ammount of battles that you can fight. Meat can be obtained through various means:
-Becoming a VIP by purchasing diamonds, recharging them, or buying cards, will indirectly help you get vast ammounts of meat (you can buy meat using diamonds). You can still exchange 50 diamonds for 120 meat, 3 times a day
-Certain achievements can give meat
-Leveling up your crew level (not crew mates) will always reward you with meat
-Creating or joining an alliance, and then "cheering" an alliance member of higher level, will reward you with meat
-Being online at 12:00-14:00 (120 meat), 18:00-20:00(60 meat) or 21:00-23:00(60 meat) will reward you with meat. You can get your meat by going to the "Daily Events" menu and claiming your reward. This is available daily. All times are server times.
Sign in
You should always log in and claim your rewards. You can claim your reward by going to the "Sign-in" icon, and clicking the first icon (the copper beri coin on the upper left side). You can only claim rewards in one order, starting from left to right in the first row, with the first top row, ending with the bottom row. The sign-in is restarted at 5:00 (server time).
Events
You can click here to get description about the current events. Note that there could be hidden events active, revealed only on the official Facebook page for the game: https://www.facebook.com/StrongWorldD
Achievements
Achievements work in a similar way to "Daily Events", however you can only get each of the rewards only once (with the exception of the "Continous Weekly Login" achievements), and your progress is not lost if the day passes, unlike "Daily Events". Note that for both "Daily Events" and Achievements, a new "day" starts at 5:00 (server time)
Mailbox
Your Mailbox can be used to receive messages from the official staff of Strong World D.. You should check it whenever you get a message, because it probably means that you are given some kind of reward. All you have to do is open the message in order to claim your reward //*not sure*
Ordeals
Ordeals are a type of battle mode. They become available when you reach a crew level of 25. You can fight here and complete a daily task. Each battle costs 6 meat, and you only have a maximum of 5 chances each day, for each type of battle (limit restarts at 5:00, server time). Difficulty 1 requires a crew level of 25, difficulty 2 requires a crew level of 30, difficulty 3 requires a crew level of 60, and difficulty 4 requires a crew level of 75. There are also difficulties 5 (required crew level 81) and 6 (required crew level 85) but they are currently closed and no information is available, not to mention the current crew level limit is 80. Note that ordeals have a huge advantage, as they can easily give rare items in vast amounts. There are 3 different types of battles here:
Kid's Realm: Opens at 5:00 (server time) every Tuesday, Friday and Sunday. The battle has very weak opponents who are immune to physical attacks (only elemental attacks will hurt them). The rewards are: Flamingo Overcoat(only at difficulty 4), XDrake's Hat(only at difficulty 4 and 3), Kukri(only at difficulty 4, 3 and 2), Crocodile's Hook(any difficulty)
![]()
![]()
![]()
![]()
![]()
![]()
![]()
![]()
![]()
![]()
![]()
![]()
![]()
![]()
Seastone: Opens at 5:00 (server time) every Wednesday, Saturday and Sunday. The battle has very weak opponents who are immune to elemental attacks. The rewards are: Durandal(only at difficulty 4 and 3), Throwing Knife(only at difficulty 4, 3 and 2), Starfish Bracelet(only at difficulty 3, 2 and 1). Note: The fact that difficulty 4 gives less items is a bug. It was supposed to also give starfish bracelet and blue crystal fragments.
![]()
![]()
![]()
![]()
![]()
![]()
![]()
![]()
![]()
![]()
![]()
![]()
Amazon Lily: Opens at 5:00 (server time) every Monday, Thursday and Sunday. The battle has only very weak opponents, who are female characters accompanied by various mutant animals. The rewards are: Shichiseiken(only at difficulty 4), Shodai Kitetsu(only at difficulty 4 and 3), Golden Crown(only at difficulty 4, 3 and 2), Golden Pistol(any difficulty)
![]()
![]()
![]()
![]()
![]()
![]()
![]()
![]()
![]()
![]()
![]()
![]()
![]()
![]()
All Blue
All Blue are a type of battle mode. They become available when you reach a crew level of 14. You can fight here and complete a daily task. Each battle costs 6 meat, and you only have a maximum of 2 chances each day, for each type of battle (limit restarts at 5:00, server time). Difficulty 1 requires a crew level of 14, difficulty 2 requires a crew level of 30, difficulty 3 requires a crew level of 50, and difficulty 4 requires a crew level of 70. There are also difficulties 5 (required crew level 81) and 6 (required crew level 85) but they are currently closed and no information is available, not to mention the current crew level limit is 80. Note that All Blue has a huge advantage, as it can easily give vast amounts of beli or drinks (which can be used to get character experience). There are 3 different types of battles here:
Baratie: opens at 5:00 (server time) every Tuesday, Thursday, Saturday and Sunday. It gives lots of beli. An iron coin can be sold for 1k beli and has white frame, copper coin for 5k and has green frame, silver coin for 20k beli and has blue frame, gold coin for 50k beli and has purple frame, diamond coin for 100k beli and has golden frame. The fact that you can sell items for half their original price, means that the coins you can buy at arena or grand line stores, are in no way better than any other item you could buy at the arena or grand line store, and sell afterwards.
![]()
![]()
![]() Difficulty 3 gives 7-9 copper coins, 11-14 silver coins, 10 gold coins and 1 diamond coin. In total, it gives 855k-925k beli.
Difficulty 3 gives 7-9 copper coins, 11-14 silver coins, 10 gold coins and 1 diamond coin. In total, it gives 855k-925k beli.
![]() Difficulty 4 gives 5-9 copper coins, 10-12 silver coins, 6-8 gold coins and 2-3 diamond coin. In total, it gives 725k-985k beli.
Difficulty 4 gives 5-9 copper coins, 10-12 silver coins, 6-8 gold coins and 2-3 diamond coin. In total, it gives 725k-985k beli.
![]()
![]()
Attack Cuisine: opens at 5:00 (server time) every Monday, Wednesday, Friday and Sunday. It gives lots of drinks, that in turn, can be used to level up whichever crew mate you desire to give it to. Daily Drink can be used to gain 60 character experience and has white frame, Cola gives 300 and has green frame, Ale gives 1500 and has blue frame, Bink's Sake gives 7500 and has purple frame. Note: you can press and hold your finger over a character's portrait, in orders to send mass amounts of drinks to him. This is especially useful when you have hundreds of drinks that you want to use.
![]()
![]()
![]() Difficulty 3 gives almost the same drinks as difficulty 4.
Difficulty 3 gives almost the same drinks as difficulty 4.
![]() Difficulty 3 gives 9 Daily Drinks, 9-13 Cola and 3-4 Ale. In total, it gives 7740-10440 exp. This is almost exactly the same as difficulty 3, because it is currently a bug
Difficulty 3 gives 9 Daily Drinks, 9-13 Cola and 3-4 Ale. In total, it gives 7740-10440 exp. This is almost exactly the same as difficulty 3, because it is currently a bug
![]()
![]()
Note:
Arena
The Arena is the place where you can fight other players in a fair 1 on 1 battle, and climb the ranking list to become the best crew. There are plenty of rewards here.
Modify: This is the crew set-up used by you to defend from an attacking enemy player.
Rules:
1. Players will receive rewards at 21:00 each day. The rewards will be sent via the in-game mail. 2. Arena battles are fought automatically 3. In Arena battles, all heroes' HP and healing rate will be increased with the same magnitude 4. If you attack and beat an opponent with a higher ranking, you will switch rank positions. 5. If you run out of time, the defending side will win the battle 6. Each player can challenge 5 times, another enemy player, for free. The ammount of chances resets back to 5, daily at 5:00 (server time) 7. After each battle, the attacker needs to wait 10 minutes before being able to challenge yet another player. 8. Players in battles can't be selected as opponents.
Highest Ranking Reward Rules:
When a player gets a new highest ranking, (s)he will be rewarded with diamonds. Rewards are based on the player's ranking. Players will receive at least 1 diamond every time. Rewards will be sent via the in-game mail.
The highest possible daily reward is, for the player who has rank 1, is: 800 arena coins, 550 diamonds, 100.000 beli and 12 ale. The rewards are waiting for you!
Ranking: Shows the current list for the top 50 players, according to their arena ranks
Battle Record: Shows info of your previous battles. You can choose to share your battle replays with all the players in the game via the world chat, or your alliance members. You can also view the replay yourself.
Exchange: Enter the Arena Store. Arena coins are used to buy items at the Arena Store (go to Arena and click "Exchange" in order to check the store. Also, Vivre cards for Mihawk, Jimbei and Kuma will always spawn in the store, and renew daily. Your ammount of arena coins are shown on the upper left side). You can get coins by having *unknown arena rank* at 2100. The ammount of coins you get depends on your rank, you can check by clicking the "Rules" button in the Arena menu. The reward is given daily. Note that your rank is not lowered when you lose a fight, but it will be lowered if a player decides to attack you.
Change: You can click this button as many times as you want, in order to be given 3 different options of challenging players to the arena.
Challenge: Click this button below the enemy player, in order to start setting up your attack team and fight the enemy player.
Strategies
Your main two objectives, in order to get stronger, should be to be able to be good enough to finish the grand line each day, and get the highest arena rank possible (apart from all the other daily things you can finish). The better results you have in arena and grand line, the stronger you will get. Here are some tips for the arena:
-You can only use 5 characters, so it's pretty pointless to focus on more than 5. However, do take into account that you sometimes might want to change your set-up, depending on the enemy team (having too many front row characters might make it easier for the enemy to beat you, if the enemy has characters that do small area damage to the front row characters). Another thing to take into account is that each character levels up at a different rate. You will frequently find yourself in gaps where you cannot equip any items on your character because the required character level is too high. Therefore, you might want to look around if you can temporarily use another character, who is slightly stronger, until your main character can start equipping items again.
-While in adventure mode, skills (especially special skill) make a difference, in the arena you will face opponents with high damage and low hitpoints, who will not give your characters much time to make use of their skills (especially not special skill). You should take this into account and not rely too much on the offensive attributes of the first, maybe even 2nd front row character, especially not their special skill, since they will quickly die. In most cases, the first front row character dies before he can use his special skill even once. Doriki is a good indicator, but not accurate, since it takes into account skill. This becomes especially inaccurate at high levels (50+), therefore you should click the enemy player's avatar in order to see his team, and take into account the equipment level and number of stars that he has.
-As stated before, skills are not very useful in arena, but you should not hesitate to level them up. However, you should start investing your time as soon as possible, and each day, get vivre cards for your favorite characters, since you have a very limited amount of attempts each day, and it takes a lot of attempts in order to promote your character to the next star. Stars and equipment level are the two main ways you should focus on improving your arena characters, and you should also consider imbuing the items on your main characters. Note that once you level up the equipment of a character, all imbuement will be lost. also, you can use almost any item as imbue points, so you should consider using a type of item that you have too many of. A good example are the items that you constantly get from ordeals, and not sell your items.
-In general, especially at high levels (50+), characters that are good are usually the ones who can stun or slow the enemy down, such as Mihawk, Boa Hancock, Luffy, Foxy, Aokiji and others. You will find that other characters can be pretty good, such as Smoker who can get behind enemy lines and spread the damage a little bit by offering himself to tank, not only that, but if he is successful at going all the way to the back of the enemy lines, the enemy will turn towards smoker, and when the enemy attempt their special attack, it will most likely only be pointed towards smoker, instead of your whole team. Do note that smoker also has a chance to stop behind one of his allies who might block the way. Most of the time, Chopper is very weak in the arena, due to the fact that the enemy does damage at a faster rate than chopper can heal, but do not forget that chopper is the most important character in adventure and grand line modes.
-Even if you lost a battle, you can attempt it again. Note that there is a small luck factor in the game, and it does not cost you anything to attempt a battle. You have 5 free chances, and you should make use of them. Note that the 5 chances are reset each day at 5:00 (server time) and the rewards are decided based on the rank that you have at 21:00 (server time). It is completely irrelevant to the reward, what rank you have before 21:00. Do not forget to claim your reward through the message system, each day.
Pirate Tavern
The Pirate Tavern is a great place to easily get items along with drinks that can be used to level up whichever crew mate you desire. Each day you can get 5 cola for free (note that there is a cooldown time after you get a free one) and every 48 hours you can get a big ale for free. After the 10th time you get a cola, you get a blue item, and after the 10th time you get an ale, you get a pirate. If you already own the pirate that was going to be given to you, you will instead get a whole bunch of vivre cards for that respective pirate. Note: whenever you get a drink, regardless if it's for free or if you buy it, you are also given an item. Vivre cards can also be given along with cola. Just don't get addicted and spend all your money drinking! Note that vivre cards in this tavern spawn ONLY for characters that you can get through "Adventure" mode, depending on the elite missions that you unlocked. The ammount of one type of item that you can get from the tavern are 1, 2 and 7. You also have an extremely rare chance of getting a purple item (roughly 1 in 1000).
The vivre cards that can be received from obtaining cola are:
Confirmed: Buggy, Chopper, Dalton, Miss Doublefinger, Sham, Usopp.
Unconfirmed (highly unlikely): Alvida, Arlong, Buchi, Buggy, Cabaji, Chew, Franky, Hachi, Jango, Krieg, Kuro, Kuromarimo, Kuroobi, Luffy, Miss Merry Christmas, Miss Valentine, Mohji, Morgan, Mr. 1, Mr. 2, Mr. 3, Mr. 4, Mr. 5, Nami, Nico Robin, Pearl, Sanji, Smoker, Tashigi, Vivi, Wapol, Zoro.
The vivre cards that can be received from obtaining ale are unknown, but speculated to be almost any, except Akainu, Aokiji, Kizaru, Ace, or Blackbeard.
The pirates that you can receive from obtaining 10 ale are: Brook, Crocodile, Enel, Franky, Boa Hancock, Kuma, Law, Mihawk, Jimbei, Miss Valentine, Morgan, Smoker, Vivi, Kuromarimo, Krieg, Gedatsu, Bellamy, Mr. 5, Arlong, Jango, Kalifa, and Ryuma. (More to be added as people receive them)
For vip 11 players, Bink's offer will be unlocked at the pirate tavern. Each barrel gives 7500 character experience, and costs 400 diamonds, but also gives vivre cards for any character, as well as other valuable items (mainly green and blue, possibly even purple)
Adventure
This is where you should start the game. You can get various items here, and get the hang of the game. The first 1-2 chapters should seem easy, while starting to get a bit harder around chapter 3-4. At chapter 5-6 you should start getting familiar with other modes as well. The game should leave you enough room to try out different characters, but do note that getting vivre cards is something that you should invest ahead of time, since you can do very few attempts each day.
A dedicated page, showing detailed info for each mission, will be added later.
Shop
In the shop, you can buy various items in exchange for beli or diamonds. They are usually of lower level compared to the Grand line Store, Arena Store, Takoyaki stand or Level 5.5 Shop, but it can still have useful items, and they are not too expensive. The item list refreshes daily at 21:00 (server time), however you can force the list of items to be refreshed with new items, if you pay 50 diamonds. Note that vivre cards in this shop spawn ONLY for characters that you can get through "Adventure" mode, depending on the elite missions that you unlocked.
Grand Line
The Grand Line mode is available to you once you reach a crew level of 31. This mode contains 15 islands, based on the One Piece story. It starts from the Laboon incident, all the way to the Dressrosa arena, followed by the Marine HQ island. On each island awaits a player roughly the same crew level as you (-10 levels lower to +5 levels higher). The enemy players are spread roughly with the low ones starting on the beginning of the Grand Line, ending with the highest level players being at the end, but you may very likely find battles where one of your opponents were weaker than the previous ones that you fought one island before. The enemy players use their player set-up from their "Arena" mode set-up, so you should expect them to use their best characters. You can get various items and beli on the Grand line, but you obtain "Grand Line Coins" only here. You can use them afterwards in the Grand Line Store by clicking "Exchange". The vivre cards for Enel, Law and Boa Hancock always spawn here, and renew daily.
Strategies
-You can pick 5 pirates to fight an enemy player, and you get the option to pick your team for each island.
-Your characters will keep their hitpoints and energy bar at the end of a battle, same way you keep it when you go from one screen to the next, in "Adventure" mode. Do note that at the end of the battle, your pirates will each have a certain ammounts of hitpoints and energy, restored to them, same way it works in "Adventure" mode. Also note that this goes the same for the enemy player, meaning that it is a horrible idea to try to send a suicide squad to use their special attacks to lower the hitpoints of the enemy, in order to save the hitpoints of your main 5-pirate squad, because this way, the enemy will still regain a low ammount of hitpoints, but more importantly, the enemy will charge up their energy and use it afterwards on your main crew. Relative to this, you should keep in mind that in all battles, you should try to save up your energy just enough so that you can release your special attacks as soon as the next fight starts, at the beginning of the fight. In other words, you should prioritize on characters leveling up their first skill. Also, you should focus in the first easy fights on filling up your energy bar for your strong pirates. The first fight should always be with your main team, to fill up their energy bar, and starting with the 2nd fight, you can fill up the energy bar of your front-row characters (including the mediocre ones), and after you are done with them, you can continue with the mid-row and back-row characters. You should not get greedy and try not to make your team too weak, because then, you will just carelessly get your pirates killed. When charging the energy bar for your front row characters, you might want to try and not pick any back-row or mid-row characters except chopper, because the more front-row characters there are, the higher chance you have of the enemy spreading his attacks across several of your front-row characters, instead of focusing fire on just one. This will make it easier to heal your characters using chopper's special skill, and the end of the fight will give you more hitpoints healed across more characters. Do note, it is absolutely worthless to bother using weak characters, unless you simply have no other pirates left to choose. It is best to use your best pirates, along with your near-best. Even mediocre ones will give you problems. Going out of your way to recharge the energy bar for mediocre pirates, will most likely be at the cost of the hitpoints of your strongest pirates.
-Chopper is THE most important pirate here, because of his ability to heal your crew. Note that he will always try to give a bottle of medicine 10 seconds after the battle started, to your pirate with the lowest ammount of hitpoints. Do NOT use his special healing skill while he is trying to give the bottle, otherwise the bottle will be lost.
-Each pirate has an internal ID, similar to how each profile on facebook has a specific ID assigned to it, that will never change, regardless of anything else that happens. Your 5 pirates will be sorted according to, first of all, if the pirate is front-row, mid-row, and then back-row. The second thing is the pirate ID, meaning that certain front-row pirates will always go in front of other front-row pirates that you have, and will be the first ones to get hit (also note that the more front-row pirates you have, the lower the chance of the enemy pirates focusing fire on your first front-row pirate). For the sake of understanding what's going on, we will call front-row pirates who are put in front of other front-row pirates, "brave", and for rest of the other front-row pirates, "cowardly". You can use this system to start your battles with "cowardly" front row pirates, and when they are left with less than half hitpoints, you can put a more "brave" front-row pirate in front of the "cowardly" front-row pirate, in order to let the "coward" heal while the "brave" one tanks the damage. You should try to time chopper's special healing so that he heals both the coward and the brave pirates at the same time. Using the skill while the brave pirate is at full hitpoints, will give you half the effect, and is essentially half efficient. You should try using this method with several front-row pirates, but do note that the "bravest" front-row pirate will never have anyone to block damage while he heals, so you should make the best use of this technique, and try to keep your front-row pirates as powerful as possible, in order to be able to block all the damage alone, without dying. Also note that by going in a battle with one of your pirates having half hitpoints or less, as well as going out of your way to use your non-best characters, means that you are lowering your squad's overall powe, and might make you lose the whole battle, so only use this technique against enemy players that you are certain you can beat without losing a single pirate.
-Same as Chopper, there are certain characters that are considerably more useful on the Grand Line, due to their skills. These are essentially pirates that can drag the battle, such as Jango(has the ability to "hypnotize" opponents, essentially leaving them paralyzed for several seconds, as well as Jango), Boa Hancock(has the ability to turn enemy pirates to stone, leaving them paralyzed for several seconds, but not as long as Jango), Smoker (has the ability to behind enemy lines, all the way to the back. In turn, Smoker starts getting hit, but some enemies have abilities that attack in a straight line, so instead of the enemy damaging your entire crew with their skills, it will only damage Smoker. Also, this spreads the damage across your crew instead of focusing fire on your pirates, so your healing will be more effective. Note that Smoker might stop in his tracks if a pirate blocks his way, most of the time being one of your own pirates, but if you try to make Smoker use his ability as soon as the battle starts, it has a much lower chance of happening. The second time Smoke uses his special ability, he will try to go back to friendly lines, and this will allow you to get him to safety and get him healed), Blueno (similar to smoker, he can go behind enemy lines and put 1 of the enemy pirates in their front-row. However, the second time Blueno uses his skill, he will put the back-row enemy, where he initially was, and Blueno will go back to his own spot, in the front-row of your crew), Aokiji(has a series of ice attacks that slow down the enemy by half, giving you more time to heal) and Foxy (has a better slow down ability than Aokiji). In other words, defensive crew mates are useful, but do not go out of your way unless they are really worth it. For example, Franky is not great, despite his defensive abilities.
-Once the timer for the fight runs out, both you and your opponent will have a small portion of hitpoints and energy recharged. Afterwards, you can attempt to fight again, the same battle.
-You fight the AI, controlling various player's crews. As always, the AI uses the "auto" feature, meaning he will use his special attacks as soon as they charge up.
Imbue
If you have too many of one type of item, do not worry. Instead of selling it for half the initial price, you can consider asking Rayleigh to imbue items for you. Each item is worth a certain number of imbue points, green being worth more, blue even more, and purple are even better, but gems are the most economical, since they are meant for the purpose of imbuing items. Imbuing items will give them better stats, but do note that the effects will completely disappear once you upgrade your crew mate due to the items. There are, however, 2 important reasons as to why you should imbue items; first, you can get your Daily Event done, and get free beli, crew experience and a free gem stone, and the second, you will often find yourself in tough situations in the Arena or the Grand Line, especially at high levels. Imbued items will easily give you the edge that you need. Not to mention that maxed out crew mates from items will not lose their imbues, since they will no longer be able to level up relative to their items, but that will be a very long way, so you shouldn't worry about it any time soon. The current maximum level limit is 80, with the adventure chapter limit currently being 10.
Alliance
You can create or join an alliance. This will allow you to use the alliance chat system, and use "cheers", which give you meat. The 3 types of "cheers" are "Free Cheer" which gives you 15 meat, at no cost, the "Beli Cheer" which gives you 30 meat, at the cost of 30000, and the 3rd is *unknown*. You can only do a "cheer" with a player who has a higher crew level than yours, and you can only do it once a day. You will get your meat the next day.
Takoyaki Stand and Level 5.5 Shop
Either of the Takoyaki stand or Level 5.5 Shop have about a 1% chance of appearing at the reward screen of an Adventure battle. You will know when they appear, due to the big message at the reward screen, telling you that one of the 2 shops has appeared, and you should hurry to check them, because they will disappear after several minutes. Note that you can scroll left or right within the shop, to browse through the various items. Only beli and diamonds are used for buying items. Usually, these shops have high level items at cheap prices (often the ones that cost beli, not diamonds). Note that vivre cards in this shop spawn ONLY for characters that you can get through "Adventure" mode, depending on the elite missions that you unlocked.
Click on the triangle to have the menu pop down
Crew
In the crew menu, you can manage your crew.
Vivre cards: Vivre cards can be used to buy new crew mates. You can "promote" a crew mate that you own, by clicking on his picture and clicking "promote", but only if you have enough vivre cards. a "3/10" means that you currently have 3 vivre cards, and you need 7 more, making it a total of 10. Each crew mate has his own type of vivre card, indicated by his picture, along with a tiny burning vivre card in the upper left side, within his picture. You can check how many you need in the crew screen, by scrolling down. For example Mihawk requires 80 vivre cards and will be given with 3 stars, Kuma requires 30 vivre cards and will be given with 2 stars, and zoro requires 10 vivre cards and he will be given with 1 star. Upgrading from 1 star to 2 star requires 20 vivre cards, 2 to 3 requires 50, 3 to 4 requires 100, and 4 to 5 (which is the maximum) requires 150 vivre cards. These are important later in the game when you have no other way of increasing your crew mate's power (better known as doriki). High level players hunt vivre cards to get the edge over their opponents in the arena. Do note that they are harder to get than items the beli needed to upgrade skills, or simply upgrading your crew mate to the highest possible level, so use this as a last resort. Vivre cards can only be obtained by fighting in Adventure->elite battles, and randomly appear in the "Shop", "Takoyaki Stand", "Level 5.5 Shop" or on the Grand Line. The Grand Line Store will always sell vivre cards for Enel, Law and Boa Hancock, and Arena Store will always sell vivre cards for Mihawk, Kuma and Jimbei. There are also certain "Achievements", "Tasks" or "Sign-in" rewards that might give you vivre cards.
Skills: At the start of each battle, your character will always use the same attack pattern: start with basic attack, then use 2nd skill, then basic attack, then 3rd skill, repeat. There are 4 types of skills: -Special skill: This is the skill that you can manually activate in a battle, by clicking your character icon when it has a flashing frame. This can only be activated once your character has reached the maximum amount of energy. Each character gains some energy after each attack against an enemy character, or by winning a battle (such as an adventure mode screen, or grand line battle). The skill level is capped at the same number as the character level, and each level costs 500*current skill level beli. -2nd skill: This skill is unlocked when you upgrade your character to the green frame (equipment level 2). The skill level cap and price are the same as the first skill. -3rd skill: This skill is unlocked when you upgrade your character to the blue frame (equipment level 4). The skill level cap is character level-20 and each level costs 500*(20+current skill level)-500 beli. -4th skill: This is always a passive skill, and is unlocked when you upgrade your character to the purple frame (equipment level 7). The skill level cap is character level-40 and each level costs 500*(30+current skill level)-500 beli.
You can increase your character's overall power (known as doriki in this game) by equipping him with various items. Each item has a description that shows exactly what the bonuses of the item are. Each slot is reserved for a specific type of item. You can click on the empty item slot to get more details, including how to get the item (click "Synthesis Formula" then on the right side click the item, and then click the level that you want to go to). Note that you can get the same exact items from the "elite" version of the adventure level. The only difference is that the elite version is harder, must be unlocked on its own through the adventure-elite mode, requires 12 meat instead of 6, and will give you a certain vivre card.
Clicking on the crew mate will make him perform a random animation. All possible animations are: stand, walk, basic attack, special skill, 2nd skill, 3rd skill, win battle. The animation for getting hit or getting defeated are not included.
The "Bounty" button toggles if you want to hide or show the current pirate's wanted poster.
The "Details" button toggles the stats info for your character.
Stats:
What is Stats growth rate? Every character has a primary stat. You can see this stat by looking at a particular characters profile. Every character has a symbol to the left of their name indicating which stat is their primary stat; a book for wisdom, a fist for strength and a sword for agility. The primary stat indicates which stat has the greatest growth rate. E.g. Boa as a wisdom based character receives more wisdom for every level compared to agility or strength.
Strength – Strength increases your characters Health and Physical Defense.
Wisdom – Wisdom increases your characters Special Attack.
Agility – Agility increases your Physical Crit Hit and your Physical Attack.
Each of these stats increase Physical Attack if your character has this particular stat as his primary stat, however agility based characters receive slightly more physical attack for each point of agility.
Does it matter whether or not I have my characters equipment imbued before upgrading? No. Imbuements are a temporary boost to your characters and only last as long as your character has the imbued item equipped. If you upgrade your character you will lose any and all imbuements on his equipment and will receive a few Gems as compensation. This is why your Doriki might decrease after upgrading the character as his imbuement stats are lost.
You can check the list of all characters by clicking here.
Bag
Here, you can view what items you have in your possesion. Note that items that have a white frame are level 1 (weak, cheap, easy to find), then comes green, blue and purple.
All: this shows all the items you have in your possesion
Equip: this shows all the items you posses, that can be equipped by any character in the game.
You can check the item encyclopedia by clicking here.
Synthesize
This menu does not do much, you can view your items which are fragments, combine them to make a whole item (for example "Crocodile's hook" requires 5 "Crocodile's Hook Fragment" in order to be constructed). Only blue and purple items have can have such properties. Blue items require 5 fragments, while purple items require 20. Sometimes, items also require blueprints as well. However, all of this information is easily shown when you try to put an item on your character, what items are required, how many, and where you can get them, plus the ability to synthesize them right there and then.
Tasks
Tasks work just like "Achievements". The info on how how to complete them and what the rewards are, are shown right there. Just remember to claim your reward after you finish a task, and check afterwards if a new task has appeared. Note that eventually, when you reach crew level of around 20-40, you will stop receiving tasks entirely, with the exception of the "Welcome Aboard!" which go up as high as having to get 18 crew mates (also known as "heroes")
Daily Events
Daily Events work in a similar way to "Tasks" and "Achievements". The difference is that they are always reset daily, regardless if you completed them or not, at 5:00 (server time). They will show show you the requirements to complete each one, along with the reward. Remember to go back to this menu to claim your reward when you have completed it. Also note that each day, you can log in between 12:00 and 14:00 (server time) in order to obtain //*unknown ammount* of meat. You have to check the "Daily Events" menu and claim it. Also note that you can also log in between 18:00 and 20:00 or between 21:00 and 23:00 to get more meat.